SP.NET 3.5 Windows-Based Authentication
by Yogendra Pratap Singh(assistant Professor)This article looks at Windows-based ASP.NET authentication, one of several different types of authentication measures ASP.NET 3.5 provides to use within your applications. ASP.NET has several ways of performing Windows-based authentication and we'll look at all of them: Integrated Windows authentication, Basic authentication, and Digest authentication. You'll also see in this article that if you are running your ASP.NET 3.5 pages on IIS 7 and Windows Vista, some of the authentication options will be configured with slightly different steps than in IIS 5.0 and 6.0 on Windows Server 2003 or Windows XP.
In ASP.NET terms, authentication is the process that determines the identity of a user. After a user has been authenticated, a developer can determine if the identified user has authorization to proceed. It is impossible to give an entity authorization if no authentication process has been applied. You should never authorize access to resources you mean to be secure if you have not applied an authentication process to the requests for the resources.
Authorization is the process of determining whether an authenticated user is permitted access to any part of an application, access to specific points of an application, or access only to specified datasets that the application provides. Authenticating and authorizing users and groups enable you to customize a site based on user types or preferences.
The different authentication modes are established through settings that can be applied to the application's
web.config file or in conjunction with the application server's Internet Information Services (IIS) instance.ASP.NET is configured through a series of
.config files on the application server. These are XML-based files that enable you to easily change how ASP.NET behaves. This is an ideal way to work with the configuration settings you require. ASP.NET configuration files are applied in a hierarchal manner. The .NET Framework provides a server-level configuration file called the machine.config file, which can be found at C:\Windows\Microsoft.NET\Framework\v2.0.50727\CONFIG. The folder contains the machine.config file. This file provides ASP.NET application settings at a server-level, meaning that the settings are applied to each and every ASP.NET application that resides on the particular server.A
web.config file is another XML-based configuration file that resides in the root of the Web application. The settings applied in the web.config file override the same settings applied in the higher-level machine.config file.You can even nest the
web.config files so that the main application web.config file is located in the root directory of your application, but additional web.config files reside in some of the application's subdirectories (see Figure 1). The web.config files contained in any of the subdirectories supersede the root directory's web.config file. Therefore, any settings applied through a subdirectory's web.config file change whatever was set in the application's main web.config file. 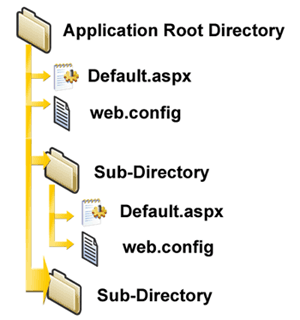
Figure 1 In many cases, you can use the
web.config file to apply the authentication and authorization mechanics you want in your applications. You also can work with IIS to apply settings directly to your applications.IIS is the Web server that handles all the incoming HTTP requests that come to into the server. You must modify IIS to perform as you want. IIS hands a request to the ASP.NET engine only if the page has a specific file extension (for example,
.aspx). This article will work with IIS 7.0 as well.The <authentication> Node
You use the<authentication> node in the application's web.config file to set the type of authentication your ASP.NET application requires:<system.web> <authentication mode="Windows|Forms|Passport|None"> </authentication> </system.web>The
<authentication> node uses the mode attribute to set the form of authentication that is to be used. Options include Windows, Forms, Passport, and None. Each option is explained in the following table.| Provider | Description |
Windows | Windows authentication is used together with IIS authentication. Authentication is performed by IIS in the following ways: basic, digest, or Integrated Windows Authentication. When IIS authentication is complete, ASP.NET uses the authenticated identity to authorize access. This is the default setting. |
Forms | Requests that are not authenticated are redirected to an HTML form using HTTP client-side redirection. The user provides his login information and submits the form. If the application authenticates the request, the system issues a form that contains the credentials or a key for reacquiring the identity. |
Passport | A centralized authentication service provided by Microsoft that offers single login and core profile services for member sites. This mode of authentication was de-emphasized by Microsoft at the end of 2004. |
None | No authentication mode is in place with this setting. |
Windows-Based Authentication
Windows-based authentication is handled between the Windows server where the ASP.NET application resides and the client machine. In a Windows-based authentication model, the requests go directly to IIS to provide the authentication process. This type of authentication is quite useful in an intranet environment where you can let the server deal completely with the authentication process — especially in environments where users are already logged onto a network. In this scenario, you simply grab and utilize the credentials that are already in place for the authorization process.IIS first takes the user's credentials from the domain login. If this process fails, IIS displays a pop-up dialog box so the user can enter or re-enter his login information. To set up your ASP.NET application to work with Windows-based authentication, begin by creating some users and groups.
Creating Users
You use aspects of Windows-based authentication to allow specific users who have provided a domain login to access your application or parts of your application. Because it can use this type of authentication, ASP.NET makes it quite easy to work with applications that are deployed in an intranet environment. If a user has logged onto a local computer as a domain user, he will not need to be authenticated again when accessing a network computer in that domain.The following steps show you how to create a user. It is important to note that you must have sufficient rights to be authorized to create users on a server. If you are authorized, the steps to create users are as follows:
- Within your Windows XP or Windows Server 2003 server, choose Start-->Control Panel-->Administrative Tools-->Computer Management. If you are using Windows Vista, choose Start-->Control Panel-->System and Maintenance-->Administrative Tools-->Computer Management. Either one opens the Computer Management utility. It manages and controls resources on the local Web server. You can accomplish many things using this utility, but the focus here is on the creation of users.
- Expand the System Tools node.
- Expand the Local Users and Groups node.
- Select the Users folder. You see something similar to the results shown in Figure 2.
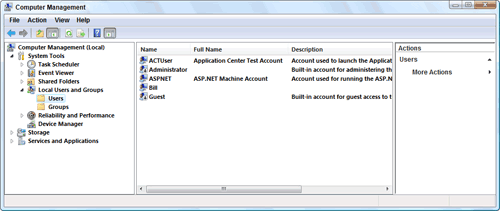
Figure 2
- Right-click the Users folder and select New User. The New User dialog appears, as shown in Figure 3.
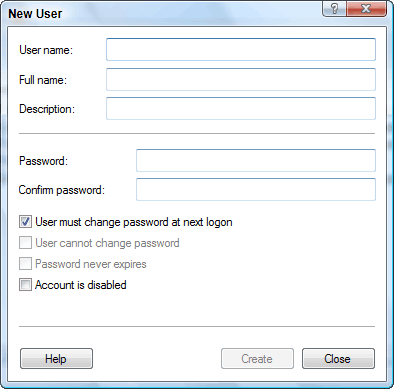
Figure 3
- Give the user a name, password, and description stating that this is a test user. In this example, the user is called Bubbles.
- Clear the check box that requires the user to change his password at the next login.
- Click the Create button. Your test user is created and presented in the Users folder of the Computer Management utility, as shown in Figure 4.
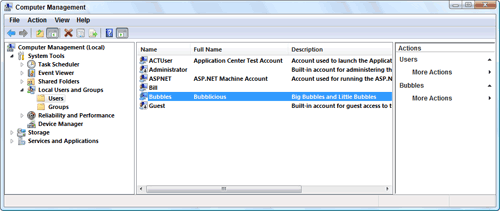
Figure 4
Authenticating and Authorizing a User
Now create an application that enables the user to enter it. You work with the application'sweb.config file to control which users are allowed to access the site and which users are not allowed.Add the section presented in Listing 1 to your
web.config file.Listing 1: Denying all users through the web.config file
<system.web>
   <authentication mode="Windows" />
   <authorization>
      <deny users="*" />
   </authorization>
</system.web>
In this example, the web.config file is configuring the application to employ Windows-based authentication using the <authentication> element's mode attribute. In addition, the <authorization> element is used to define specifics about the users or groups who are permitted access to the application. In this case, the <deny> element specifies that all users (even if they are authenticated) are denied access to the application. Not permitting specific users with the <allow> element does not make much sense, but for this example, leave it as it is. The results are illustrated in Figure 5.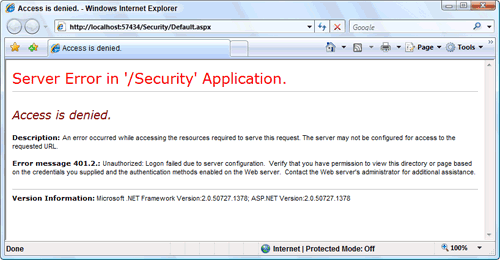
Figure 5 Any end user — authenticated or not — who tries to access the site sees a large "Access is denied" statement in his browser window, which is just what you want for those not allowed to access your application!
In most instances, however, you want to allow at least some users to access your application. Use the
<allow> element in the web.config file to allow a specific user. Here is the syntax:<allow users="Domain\Username" />Listing 2 shows how the user is permitted access.
Listing 2: Allowing a single user through the web.config file
<system.web>
   <authentication mode="Windows" />
   <authorization>
      <allow users="REUTERS-EVJEN\Bubbles" />
      <deny users="*" />
   </authorization>
</system.web>
Even though all users (even authenticated ones) are denied access through the use of the <deny> element, the definitions defined in the <allow> element take precedence. In this example, a single user—Bubbles—is allowed.Now, if you are logged on to the client machine as the user Bubbles and run the page in the browser, you get access to the application.
Looking Closely at the <allow> and <deny> Nodes
The<allow> and <deny> nodes enable you to work not only with specific users, but also with groups. The elements support the attributes defined in the following table.| Attribute | Description |
Users | Enables you to specify users by their domain and/or name. |
Roles | Enables you to specify access groups that are allowed or denied access. |
Verbs | Enables you to specify the HTTP transmission method that is allowed or denied access. |
*):<allow roles="*" />In this example, all roles are allowed access to the application. Another symbol you can use with these attributes is the question mark (
?), which represents all anonymous users. For example, if you want to block all anonymous users from your application, use the following construction:<deny users="?" />When using
users, roles, or verbs attributes with the <allow> or <deny> elements, you can specify multiple entries by separating the values with a comma. If you are going to allow more than one user, you can either separate these users into different elements, as shown here:<allow users="MyDomain\User1" /> <allow users="MyDomain\User2" />or you can use the following:
<allow users="MyDomain\User1, MyDomain\User2" />Use the same construction when defining multiple roles and verbs.
Authenticating and Authorizing a Group
You can define groups of individuals allowed or denied access to your application or the application's resources. Your server can contain a number of different groups, each of which can have any number of users belonging to it. It is also possible for a single user to belong to multiple groups. Pull up the Computer Management utility to access the list of the groups defined on the server you are working with. Simply click the Groups folder in the Computer Management utility, and the list of groups is displayed, as illustrated in Figure 6.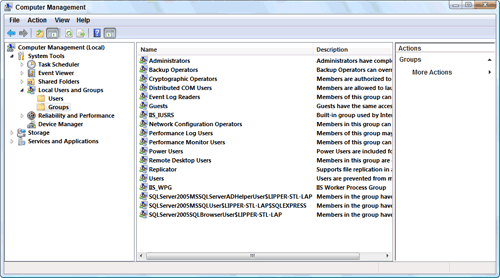
Figure 6 Right-click in the Groups folder to select New Group. The New Group dialog displays (see Figure 7).
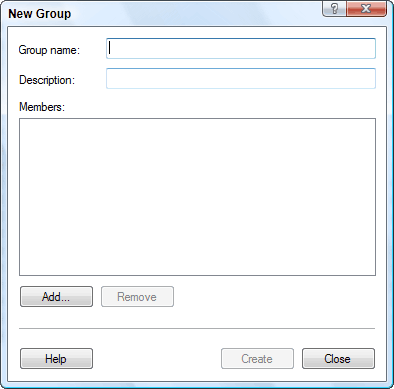
Figure 7 To create a group, give it a name and description; then click the Add button and select the users whom you want to be a part of the group. After a group is created, you can allow it access to your application like this:
<allow roles="MyGroup" />You can use the
roles attribute in either the <allow> or <deny> element to work with a group that you have created or with a specific group that already exists.Authenticating and Authorizing an HTTP Transmission Method
In addition to authenticating and authorizing specific users or groups of users, you can also authorize or deny requests that come via a specific HTTP transmission protocol. This is done using theverb attribute in the <allow> and <deny> elements.<deny verbs="GET, DEBUG" />In this example, requests that come in using the HTTP GET or HTTP DEBUG protocols are denied access to the site. Possible values for the
verbs attribute include POST, GET, HEAD, and DEBUG.Integrated Windows Authentication
So far, you have been using the default Integrated Windows authentication mode for the authentication/authorization process. This is fine if you are working with an intranet application and each of the clients is using Windows, the only system that the authentication method supports. This system of authentication also requires the client to be using Microsoft's Internet Explorer, which might not always be possible.Integrated Windows authentication was previously known as NTLM or Windows NT Challenge/Response authentication. This authentication model has the client prove its identity by sending a hash of its credentials to the server that is hosting the ASP.NET application. Along with Microsoft's Active Directory, a client can also use Kerberos if it is using Microsoft's Internet Explorer 5 or higher.
Basic Authentication
Another option is to use Basic authentication, which also requires a username and password from the client for authentication. The big plus about Basic authentication is that it is part of the HTTP specification and therefore is supported by most browsers. The negative aspect of Basic authentication is that it passes the username and password to the server as clear text, meaning that the username and password are quite visible to prying eyes. For this reason, it is important to use Basic authentication along with SSL (Secure Sockets Layer).If you are using IIS 5 or 6 to implement Basic authentication for your application, you must pull up IIS and open the Properties dialog for the Web site you are working with. Select the Directory Security tab and click the Edit button in the Anonymous Access and Authentication Control box. The Authentication Methods dialog box opens.
Uncheck the Integrated Windows Authentication check box at the bottom and check the Basic Authentication check box above it (see Figure 8). When you do, you are warned that this method transmits usernames and passwords as clear text.
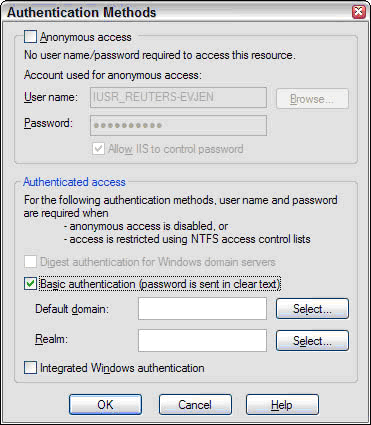
Figure 8 End by clicking OK in the dialog. Now your application uses Basic authentication instead of Integrated Windows authentication.
If you are using Windows Vista, it is not easy to find the option to enable Basic authentication. Instead, you first have to enable IIS 7 to use Basic authentication by selecting Start-->Control Panel-->Programs-->Programs and Features-->Turn Windows features on or off. From the provided dialog box, navigate to the Internet Information Services section and expand until you arrive at World Wide Web Services-->Security. From here, check the Basic Authentication option and press OK to install. This option is presented in Figure 9.
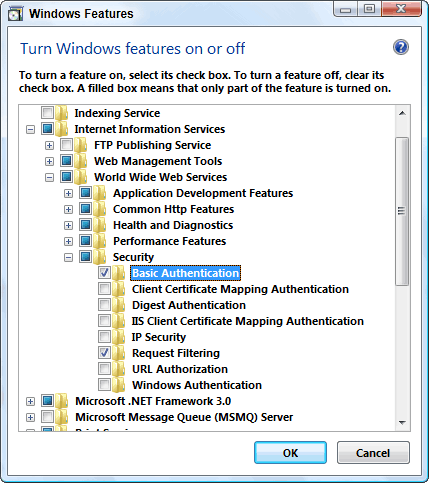
Figure 9 Once this option is installed, you can then return to the Internet Information Services (IIS) Manager and select the Authentication option in the IIS section for the virtual directory you are focusing on. From there, highlight the Basic Authentication option and select Enable from the Actions pane. This is illustrated in Figure 10.
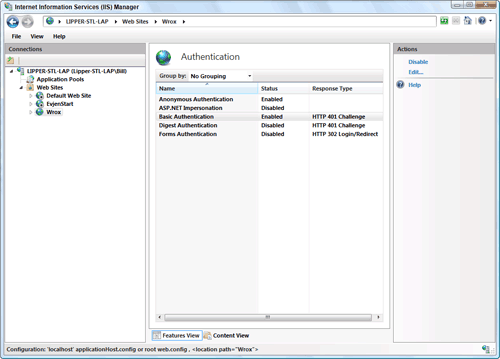
Figure 10
Digest Authentication
Digest authentication is the final mode you explore in this article. The model alleviates the Basic authentication problem of passing the client's credentials as clear text. Instead, Digest authentication uses an algorithm to encrypt the client's credentials before they are sent to the application server.To use Digest authentication, you are required to have a Windows domain controller. One of the main issues that arises with Digest authentication is that it is not supported on all platforms and requires browsers that conform to the HTTP 1.1 specification. Digest authentication, however, not only works well with firewalls, but it is also compatible with proxy servers.
You can select Digest authentication as the choice for your application in the same Authentication Methods dialog — simply select the Digest Authentication check box from the properties dialog if you are using IIS 5 or 6. If you are using IIS 7, you need to install Digest Authentication just as you installed Basic Authentication. Once installed, you will find this option and will be able to enable it from the Authentication section within the IIS Manager.
This excerpt is from Chapter 21, "Security," of the upcoming Professional ASP.NET 3.5: in C# and VB (Wrox, Feb-2008, ISBN: 978-0-470-18757-9). Bill Evjen (St. Louis, MO) is one of the most active proponents of the .NET technologies. He has been involved with .NET since 2000 and has founded the International .NET Association, representing more than 500,000 members worldwide. In addition to working in the .NET world, Bill is a Technical Director serving in the office of the Chief Scientist for the international news and financial services company Reuters. Bill is the lead co-author of the upcoming (Feb-2008) Professional ASP.NET 3.5: in C# and VB and the best-selling ASP.NET 2.0 book, Professional ASP.NET 2.0. Other related articles of interest by Bill and his co-authors, Scott Hanselman and Devin Rader, include Manipulating ASP.NET Pages and Server Controls with JavaScript, Connecting to Oracle or Access from ASP.NET 2.0, Using the ASP.NET 2.0 SQL Server Cache Dependency, and ASP.NET 2.0 FileUpload Server Control.
No comments:
Post a Comment